Wednesday 16 January 2013

P.173 Using the ND Filter (Tip #004)

The Neutral Density (ND) filter allows you to shoot photographs at lower shutter speeds by reducing the amount of light that hits the camera sensor. The term neutral density refers to the blocking out of light without producing a colour cast on the final image. Your camera has an inbuilt neutral density filter which reduces light intensity to 1/8 of actual levels (sometimes referred to as ND8, or equivalent to 3 stops).

The ND filter can be used to create images with silky smooth water or clouds. Because exposure times are increased through having applied the filter, it is usually necessary to use a tripod when taking this type of photo.

087 Teign Valley
This photo I took using a tripod. The shutter speed of this shot is 1/8th second. Because this photo was taken during autumn in dark woodland I was able to take this photo without the use of an ND filter on my camera.


2012-10-14 Laura - Exmouth 019
Here you see a situation in which I was attempting to blur the background by having you cycle past me as I took the photograph. The effect that I wanted has been achieved to a partial extent, but would have been much better if I could have applied an ND filter (which I don't have on my camera). The reason the background is not very blurred is that the shutter speed is 1/100th second, since any attempt to use a longer exposure would have resulted in an over exposed shot without the aid of an ND filter.

082 Teign Valley
One other thing to bear in mind when taking this type of shot is the fact that you want to use the lowest possible ISO setting, since you don't want to offset the effect of the ND filter through having an increased ISO setting. Lock your camera to ISO 80 (the lowest setting on your camera) before taking this type of photograph (see my tip #001, to be found under 'Tags' on the right).

The photograph right is another example of this technique being used on a waterfall. The technique can also be used to good effect on waves and, if there is a reasonable amount of movement in the clouds, on skies .


For further reading, see: 8 Tips for Long Exposure Photography on the Digital Photography School web site.

Monday 26 November 2012

P.137 Shoot evening scenes without using a tripod (Handheld NightScene) (Tip #003)

Ideally night shots are best captured by placing a camera on a tripod. But, there are times when you don't have a tripod with you, or you're in a situation where tripods are not permitted, and that's where Handheld NightScene can be very useful.

Exeter - Quay and City Centre 225
This photo I took using a tripod, but this is the type of photo that, should you not have a tripod with you, would be well suited to the Handheld NightScene mode.


Mum's Birthday at Castle Drogo 007
Handheld NightScene can be useful in any low-light situation, so as well as night scenes, it might also be used in historic properties or museums, where light is a problem and flash is not permitted. This is a photo that I took last year at Christmas, on the day we visited Castle Drogo. It would be well suited to Handheld NightScene mode, especially as the National Trust does not allow the use of tripods in their properties.


When the camera is in this mode it will take a series of photographs in a fast burst when the shutter is pressed. The number of shots is not specified in the manual, but it is thought to be four photos. The camera then processes the series of photos by blending them back together to create just a single image.

The Handheld NightScene mode will not work very well where there is movement within the photo, because the multiple images will not accurately blend together, and there will be 'ghosting' in the photograph. For this very same reason, it is necessary to hold the camera as steady as possible whilst it takes the multiple shots in the series.

Because the camera has a lot of processing to do to blend the 4 photos back into a single image, there will be a significant delay whilst the camera does this before you will be able to see the photo that you've taken.

England x-mas 09 100
One type of photograph that might be tried using this method would be to take a portrait photograph of a person in a night scene situation, such as on a street. Use flash to illuminate the person whilst in Handheld NightScene mode. The flash should correctly expose the person in the foreground, the Handheld NightScene function should correctly expose the street scene in the background. It will be important for the person to remain very still for this to work successfully. This photograph was taken using flash to illuminate the foreground.

I wish my camera had a Handheld NightScene mode!

L1 L2

Sunday 25 November 2012

P.87 Shutter Button (Tip #002)

Much of the camera's preparation to shoot a photo or video is done when the shutter button is half-depressed. As stated in the camera manual, it's recommended that the shutter be half-depressed and the camera allowed to obtain focus. Once the image is in focus, then depress the shutter button the whole way.

This has three benefits:
  1. Improved camera ability to get the focus correct.
  2. Improved image stabilization (Intelligent IS) to remove movement blur.
  3. Provides an opportunity to check that the camera is focussing on the main object.
Note that on fully depressing the shutter a shutter sound is played. This sound indicates the duration the shutter is open, and it is important to keep the camera still until the shutter sound ends.

Whilst the shutter is half-depressed, it is also worth checking the camera shake warning (#39 on p.314 of manual) to see if it's warning about camera shake. It's not always necessary to mount the camera on a tripod when this warning shows (as is said on p.99 of manual), but it is worth noting the risk of shake and taking every possible precaution to hold the camera as steady as possible when this warning shows.

And there is a fourth benefit from holding the half-depressed button, and that is, it's always good practice to squeeze rather than jab the shutter button. Use the flat part of your finger rather than the very tip, as this helps produce a soft button squeeze. A gentle shutter release is possibly the single most important action any photographer can take to increase their chance of getting a good photo. I would say, in my book of 'good camera practice', this would be my lesson number one. The provision of image stabilization on modern cameras such as the Powershot S110 helps a lot, but it still pays to hold the camera as steady as possible, and a gentle squeeze of the shutter is very, very important.

Tuesday 6 November 2012

P.169 Changing the ISO Speed (Tip #001)

In digital photography, ISO is a measure of how sensitive the image sensor is to light. The lower the ISO value, the less sensitive it is, the higher, the more sensitive. The Canon Powershot S110 can take photographs in the range ISO 80-12,800. It is possible to select to either have the ISO setting chosen automatically by the camera (ISO Auto), or it can be set specifically by the photographer.

When a low ISO setting is used, the captured photo is of the highest definition. In situations where light is plentiful (e.g., bright sunny days), locking the ISO setting to the lowest possible value will generally get you the best photos. In situations where the lighting is less than perfect (dull days, or shooting indoors without flash), then a higher ISO setting will need to be used to avoid long shutter speeds and the risk of blurred shots. Instructions on Changing the ISO Speed appear on p.169 of the manual.

The Powershot S110 has the ability to have the camera automatically choose the optimum ISO setting within a specified range, and I recommend you consider using this. This is referred to on p.170 of the manual, under the heading Adjusting the ISO Auto Setting. Here you can choose the maximum ISO speed to be used in Auto ISO mode, in the range ISO 400 - ISO 1,600. I would recommend setting this to a middle value of say ISO 800 initially. When you've built up some experience of using your camera this will guide you as to the best setting in any particular situation. Work on the premise of attempting to shoot with a low ISO value unless you're unable to get the required shot, and then up the ISO setting.

From the shots that you've taken with your camera so far, interestingly I note that none seem to be at the lowest (ISO 80) setting of your camera. The following are examples of your photos taken using various ISO settings:

007
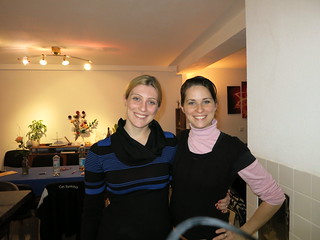
ISO 400 (Quite low ISO setting):

Here we see that the use of an ISO setting just a little above the lowest setting has nicely captured detail from Helen and Can's dining area. You and Helen are of course illuminated by camera flash. The increased sensitivity has meant background areas where the flash would not have reached are nicely exposed. The ISO not being too high has meant that the detail in the image is very high showing that at this ISO setting the camera performs exceptionally well.

IMG_0034
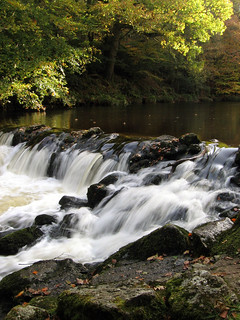
ISO 1,600 (Medium ISO setting):

Many camera's begin to struggle at ISO setting of 1,600 and yet this is an excellent photo showing very high levels of detail. The photo benefits from the use of available light (rather than flash) which makes the background clearly visible and gives the photo a very natural look. The colour rendition of this photo is also very good.


IMG_0045
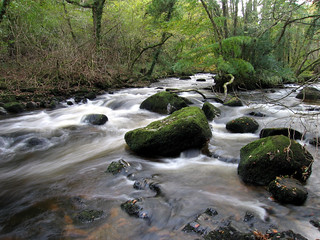
ISO 12,800 (High ISO setting):

This is the highest ISO setting possible with this camera, and as expected, there is a noticeable drop-off in resolution. Since the shutter speed was 1/100, theoretically is would have been possible to take this shot at a lower ISO setting using a slightly slower shutter speed.

The use of the natural light from the window is once again very effective making this a very pleasing photo.

Note: I examined the ISO speed of your photos by using the Flickr option 'Actions/View Exif Info'.

P.S. The Canon Powershot S110's capability to handle low light through higher ISO settings is extremely impressive. Very superior to my Powershot S60 which you used on your recent holiday in England.